Friday, December 2, 2011

My Parents Birthdays

 Hello everyone!  My parents birthdays are only a few days apart, and we usually just celebrate them both on one day.  So that is what we did!  We had them over for dinner and sang Happy Birthday to them and had Dairy Queen ice cream cake and gifts. Yummy! Really, we spoiled them for an evening and made them feel special,
(at least I think we did). 


Well, my youngest, who is 9 years old wanted to make her grandparents an exploding box, but on a much smaller scale.  So with a little help from her Momma (Me) on the cutting of the boxes and the lids, she made her own rendition of what she thought an exploding box should be like.  I loved hers!  Much more simple and less work!  But weather it is simple or very detailed, they are all done as a labor of love.  I thought that it was so sweet of her that she wanted to put money inside of their boxes...her own money from her own wallet, $.20 to be exact!  It was all in pennies, too!  Then she put a small Milky Way candy bar in it too!  So cute, and they both loved it!


Then after that, my oldest daughter gave my Mom, handmade earrings, with red glass beads!  She loved them so much that she put them on right away and wore them the rest of the evening.  My Mom loves having a granddaughter who is her own custom jewelery maker!  LOL  My dad was a little jealous that she did not make him a pair of earrings or something!  LOL  Of course he was just teasing her.


Next, it was my turn to give my gifts/cards to my parents! First I gave my Mom her napkin fold card, (which I posted earlier this past month).  She loved the front very much and then when she opened it there was a lot of Oohhhhh's and Ahhhhhh's coming from both my parents!  She thought it was so beautiful!  And yes, she saw how it reminded me of a quilt and the quilt squares.  She even started to cry a little, on us. 


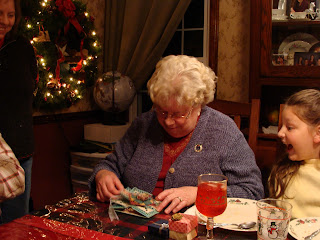
Then I gave my Dad his exploding box/barn.  He was to funny with it!  He acted like he didn't know quite what to do with it.  He almost seemed afraid to open it up!  His expression in the picture says it all!  He loved it...I think!  Later as he looked at it and read all the quotes and birthday messages, he said to me, "this had to of taken you a really long time."  He didn't believe that I made the straw bales myself.  I love the box because there is so much to look at and see.  And then I explained that when I grew up we had cows and chickens and a horse and cats and an apple tree and laundry was always hanging out on the line.  Then my Mom saw the clothes line and was a little flustered about the undergarments hanging on it!  That gave us all a good laugh! Each picture has some kind of sweet memory for me as I grew up and they helped make those memories for me. 


Anyways, I just wanted to share with you all, their response to their cards and the fun we had celebrating them and who they are.  I am so blessed to have such great, Godly, loving parents.

Well, thanks for taking a look at this and I hope that you have a blessed day!

Tuesday, November 29, 2011

Barn Exploding Box and Tutorial!

Well, my Dad's 68th birthday is coming up and I wanted to do something really fun yet special.  So I went all out for this!  I made him and exploding box that looks like a barn!  I love how this turned out!  My Dad was raised on a dairy farm and so when I was growing up we had a small farm.  No it was not a dairy farm...but we had cows, chickens, dogs, a horse, rabbits and of course what is a farm without a bunch of cats and kittens.  My Dad loves his animals and so do I, he has a tractor similar to the one inside the box.  He is very proud of it and his dog!  So naturally, I had to incorporate some of those things into his box.  And being raised in the country, means that you have clothes that get hung out on the line...  Such fond memories!  Also, I had to get him a gift card to our local Tractor Supply Store!  Well, I really enjoyed making this for him and I really cannot wait to give it to him! Hopefully you can figure out my instructions, and I hope they are not to confusing to you.  If they are, please don't hesitate to ask me questions.


I used:
Country Life Cartridge
Everyday Paper Dolls Cartridge
Paper Dolls Dress Up Cartridge
Gypsy
Core'dinations Super Assortments Sandable Card stock
Sand paper
Martha Stewart Pine Punch (for the straw bales)
Pop Dots for the tractor and Cow inside the barn/box
JoAnn Craft Essentials Metallic Dots
Gift Card to Tractor Supply Store

The box it self is from a 12"x12" sheet scored at 4" all the way around making what looks like a tick tac toe design.
Cut out the 4 corners and you will end up with what looks like a plus sign.
The lid is cut at 6 1/8"x 6 1/8" making a square.  Score at 1" on all four sides.  Next, start at one corner and only cut up to the intersection of one side of the corner.  (DO NOT CUT, the corner out).  Rotate your lid and do the exact same cut as the last one.  Do that with all 4  corners.  You will have little tabs for your lid.  Then fold all the score lines.  Glue the "tabs" to the inside of the lid.  Make sure your corners are good and square.  Your box and lid should fit together easily.  Embellish as you please before adding the roof. 
The roof of the box is cut at 10"x4 1/4" and scored at 2", 4", 5", 6" and at 8". Fold and crease all the score lines with your "bone folder".  Go ahead and attach this to the box lid by only attaching it to two sides of the lid.  Now you cut and attach the gray side pieces for the overhangs of the roof and they are cut at 2 1/2" x 4 1/2" and scored at 1 1/2".  The gray top center part of the roof, is cut at 2" x 4 1/4" and then scored at 1".
Now to make the gray strips that go around the outside of the lid and under you roof, cut 2 strips of gray at 1"x 6" and score them at 1" to make the tabs. Also, cut 2 more strips of gray at 1" x 4" to fill in under the top "flaps" that wrap around the box front and back.
First, attach the roof to the box then put your strips of gray 1" paper around to help hold and cover the roof.  Next, attach your gray roof pieces to the sides of your
roof and the top. 
Embellish as you please! 
The barn door, is actually a piece of black card stock laid over one of the outside tabs with another piece of red laid over top of that.  But the actual red door part is cut from a square of about 4" x 4".  Then I marked at  the bottom at 1", 2" and 3" for the folded parts of the doors and the 2" inch mark is for the opening of the doors.  Then I scored up the 1", and the 3"marks stopping at about 2 1/2".  Then I cut up on the 2" mark, again stopping at about 2 1/2".  Next I cut across the top of the score and cut lines, cutting across about 2", starting at 1' and stopping at 3".  Fold back your doors and then attach and embellish your doors and the outside or your box as you wish.  Then embellish the inside as you wish but have fun.  I know I did!


I hope you enjoy looking at this as much as I do!  I hope you have a wonderful day, too!