Okay, as I promised, I said that I would make an another attempt at making a tutorial...and this one is for my Wintery Window Snow Scene shaker/snow globe card. I used my wonderful gypsy to design all of it. So here we go!
I started out with my card, using the Christmas Cards Cartridge and the Plantin SchoolBook cartridge, The card is cut at 10" by 7" and the rectangle for the window is centered and cut at 3.40W by 4.76H, on the gypsy.
Next, I used the Gypsy Wanderings Cartridge and again the same cut for the rectangle cut from Plantin SchoolBook cartridge, for the frame around the window. The Gypsy Wanderings outside frame is cut at 3.9W by 5.68H with the rectangle from Plantin SchoolBook Cart. and centered.
Then glue the frame to the front of the card around the window.
Next cut the background paper just a little smaller than the card front and then set that aside.
Then, cut out 2 pieces of acetate just a slightly larger than the window of your card, I cut mine at 3.75W by 5.25H. But because the acetate is so thick, I had to cut it about 3 times which only seemed to "score" it with the pressure as high as it will go and the deep cut blade set at 6. Once the acetate is taken off the mat, you can gently bend back the edges and it will come loose enough for you to gently pull it apart. Be careful to not get in a hurry and tear the acetate. When complete, you should have 2 rectangles slightly larger than your window.
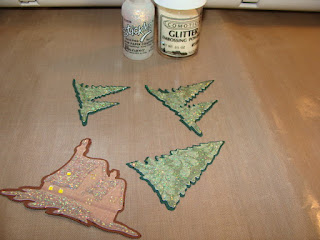
Now for the fun part, Cutting your images for your scene. I cut two sets of trees and their shadows from the Christmas Cartridges one cut at1.95W by 2.45H, and the other one at 2.46W by 3.08H. Make the shadows slightly larger with darker green paper.
The cottage/house is also from the Christmas cart. cut at 3.16W by 2.69H with the shadow slightly larger with a darker brown paper.
Then, I glued these pieces together and put Stickles: Icicle on top of the trees and the roof of the house and the grass...while the Stickles is still wet I then took and sprinkled some white glittered embossing powder on top of that. Next I took my heat gun and heated up it all a little just to help it dry and stick a little better. Plus, I get a little impatient. I just like the look it gives to it all with just a little depth and lots of sparkle.
I used DCWV The Glitter Stack card stock for the snow on the bottom of the picture, just by gently tearing the edge of it to give it that "rough edge" look.
Then,arrange the trees and the cottage how you would like them to look, and begin to glue them in place on the blue back ground paper. Making sure that they are lined up to be seen in the window of the card.
Now it is time to assemble the shaker box/snow globe.
Then take one of the two sheets of acetate and some double sided foam "dimensional" tape, and cut it into small strips to go alone the outside edge. Adhere the strips to the acetate and leaving the "backer" paper on. Make sure that there are no gaps for the glitter to leak out. The next thing is to put the desired amount of glitter on that same sheet of acetate as the "dimensional" tape. The last thing is to remove the backer paper from the tape and to place the second sheet of acetate on top. Kinda like a sandwich.
Now it is time to assemble the card. Put strong adhesive just on one side of the acetate/shaker box, right along the very edge, following the "dimensional" tape. Then glue it to the inside of your card window, making sure that none of the glue and dimensional tape are showing. The last step is to glue the scene over top of the the "shaker box window" on the card.
Here is a quick video of how I do it!
I hope this helps and answers your questions...if not please do not hesitate to send me a message and I will do my best to answer it!
Thanks for stopping by and I hope you have a
wonderful day!


Great tutorial! Lovely card too!
ReplyDeleteWhat kind of glue do you use?
ReplyDeleteI used ATG Glue, for around the window, but for the dimension, I used a foam adhesive tape glue between the two windows. I hope that helps! Have a wonderful day!
Delete