Friday, July 1, 2011

16 & Driving

Well, my nephew just turned 16 and has been so excited about being allowed to drive.  So that is why I made a little guy with a little car! I love the crystal effects turned out on the car, too! It turned out pretty cute and fun!  I hope he likes it.

I used:
Black, blue,yellow, white, and green cardstock
DCWV The Glitter Mat Stack
Paper Dolls for Everyday Cartridge
Gypsy Font Cartridge
Paper Doll Dress Up Cartridge
Yellow stickles
Cuttlebug embossing folder Polka Dots
Embossing Ink It up! pigment ink
Embossing powder from my stash (not sure, what kind or color)
Stampin' Up, Crystal Effects


Well, thanks for stopping by and taking a peek at what I have been up to these last few weeks!  I hope you have terrific day!

43rd Anniversary

My wonderful in-laws just celebrated their 43rd anniversary!  They are such a blessing to me and such a great example for others around them.  Sooooo, I made this card for them.  I love how it sparkles and shines.


I used:
A Child's Year Cartridge
DCWV the All Dressed Up stack
DCWV the glitter cardstock stack
White velum paper
Ribbon from Michael's
Stamp from my stash of years of collecting
Lime Green, Turquoise Stickles
Butterfly, from a Stampin Up stamp and cut out
Martha Steward hydrangea punch
Rhinestone brads
Homemade glimmer mist


Thanks for taking a look and have a great day!

Butterfly Get Well

This is for a special lady in our church who fell and broke her leg so bad that they had to do surgery.  She has long and slow recovery and therapy  ahead of her.  So I thought that a little card to encourage her would be helpful.  I have never used the "negative" to make a card, before.  I love how this turned out.  Simple yet very pretty.


I used:
Kates ABCs Cartridge
Blue Cardstock
K&Company Life's Journey (floral Paper)
Pink, White and Green Vellum Paper
Martha Stewart hydrangea punch
Recollections Pearl Stickers (Michael's)
Yellow Stickles


Thanks for looking and have a wonderful day!

Acetate Thank You

Sorry that I have not posted anything lately.  I have been very busy getting things ready for the 4th of July festivities here at our house.We so look forward to having everyone come to our home to celebrate with a big cookout and then later watch the fireworks in our front yard!  Either-way, I made this card for an amazing couple who came and led worship in our church last week.  What a blessing they were to us.  I thought that they needed a "Proper" thank you card.  So this is what I came up with.   


I used:
Slice Acetate Paper
Brown and Pink Card Stock
Sentimentals Cartridge
Martha Stewart Hydrangea punch
Yellow Stickles
Ribbon from Hobby Lobby
Stamp is from my stash of collecting through the years.


Thanks for stopping by and I hope you have a wonderful 4th of July!

Friday, June 17, 2011

Stair Stepper Box Tutorial

Hey, I told everyone I would try to make a tutorial on how to make my stepper box.  So this is my first time ever making any kind of tutorial and video here.  So please, if you are unsure and my directions are unclear, please don't hesitate to ask questions and I will do my best to make it more clear. 

The Box
Begin with a 12"x 6 1/2" sheet of heavy card stock
Then cut a 5" x 10" sheet of card stock (coordinating, as this will be the inside of the box)

Glue the 5'x 10" sheet of card stock to the center of the inside of the 12"x 6 1/2" sheet
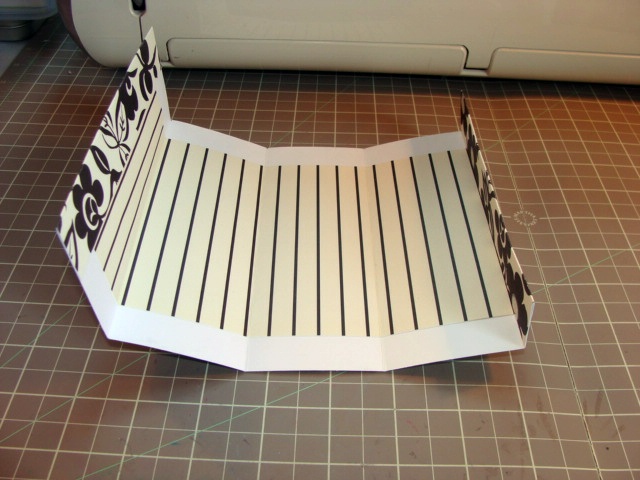
Next, fold the ends over and  glue them down as shown below.


Then, score and fold at every 2 1/4" starting at the left, you will have a small section left over, that will be the tab that overlaps for the opening of the box.

 Then set this aside.


The Lid

Cut a 4 5/16" of card stock/heavy coordinating paper.  Score at 1" around the paper to make a "tic tack toe" design as shown below.


Then starting at the bottom right hand of the score lines, only cut one side of the scored square on the corner, then rotate the paper and do the same side of the square repeating till four cuts have been made.


Next, fold all the score marks up, and fold all the scored tabs in and glue. You should have a lid that will fit your box.


Stair Stepper/Inside boxes
 
Cut 4,  6"x 6" squares out of heavy paper/card stock
Draw a line from one corner to the opposite corner making an X on the inside of your paper
Next, fold firmly one corner in to the center of your drawn X and then take that same piece and fold firmly again to be aligned with the line of the drawn X.  Then unfold.  Then repeat again to each corner until all four corners have been done.  You will end up with a grid like pattern on your paper from the folds.
Now, take the paper and find two center folds on each side of the X line,  only cut down both sides to the second square.
Follow the video, it is a lot easier to explain than to try to write it out.  I hope this will help.


Assembly of the inside of the Stair Stepper Box

Once you have finished making the inside boxes, you can begin to assemble your stepper box.
Starting with the bottom box, using a strong glue, glue it to the bottom of the outside box on just the one side of the small box, on the first fold next to the small tab, as shown below.


Then space your next boxes on the next folded tab at about 11/16" up from the bottom one.


Keep gluing each box on the next tab at about 11/16" from each other,so that you have the "stair step" effect and all 4 of your boxes are firmly glued.


Now the fun can begin!  Embellish your box how you please and have fun...then give it as a gift with some kind of goodies in the little boxes.  You could put jewelry, chocolates, small toys, money...what ever you please.  Make sure you give me credit for my work on figuring this out!  Thanks for coming by and learning how to do this.  I hope this is clear enough for you all and if you have any questions about this, please don't
hesitate to ask.


And here is mine all embellished up for my niece's graduation!


I hope you have a very wonderful day!


Thursday, June 16, 2011

Stepper Box, Father's Day

I made this stepper box for my Dad, for Father's Day, instead of a card.  He will enjoy having it with yummy goodies inside it.  My Dad has always loved his trees and being outside, so much so that he has planted over 100 trees on the property that they have lived on for the past 20 years.  And still is planting more!  LOL  Plus, the fun part and the inspiration for the plaids, is since he was a child, his sibling have called him, "Flannel" because he was always wearing flannel shirts, and flannel shirts usually come in plaids.  So that was my inspiration for the papers.  Well now that you know all of that, you can understand why I made the box like I did.
 
I used:
The Paper Studio: Mirabelle, from Micheal's
Potpourri Basket Cartridge (for the leaf and tree)
Ribbon from my stash
Stamp from Hobby Lobby
JoAnn Craft Essentials:  Metallic Adhesive Dots


Tuesday, June 14, 2011

BIL's Father's Day Card

Here are some of the cards that I made for my BIL!  Some I used my Cricut and others I did not.  The problem is that Father's Day, kinda snuck up on me.  For some reason I was thinking I had another week before it...but then I realized I had better get busy and get them in the mail if they are to receive them BEFORE Father's Day.  Oh well, I have been so busy with my Mom being a little laid up, and summer is here, and it has just been hectic around here.  Summer vacation, where are you?  I don't think that truly exists!  *SIGH*  Oh well!

Well, here is the cards that I have made!

I used:
DCWV the All Dressed up Stack (Glittered)
The Paper Studio Mirabelle (brown Card)
Classic Woodlan Paper (Red & White Card)
Card stock
Brads
Plastic Rhinestones
Silver dot stickers
Ribbon/string from my stash
Printing Press Cartridge for the "D" in Framed (brown card)
Gypsy Font Cartridge for the letters lowercase a and d, and D in Monogram, and also for the scalloped ovals( for the red/black card)
Gypsy Wanderings Cartridge for the word Celebrate in Phrase/shadow(black and Red card)
Stand and Salute Cartridge:  for the star (red & white card)


Friday, June 3, 2011

A Dozen, Thank Yous!

Well, as previously said my mom has been sick with blood clots.  So since she is not allowed to do anything strenous, I called a lady in her church to have the people make meals for my parents.  Because of that, I figured that my Mom would need to give Thank You cards to those people for being a blessing to them.  So this is why, I made 12 of them for her.  I made them so that not all are "Thank You" cards, just in case she has a few extras left over. I started making them at 4:30am and finished them up at around 7:30am.  I have never tried to "mass produce" the same card before...which is really hard for me to do! LOL  I love to make all my cards different, and these are not.  It is either the color or the stamp or the ribbon that is different. When I finished them, I put them into a nice "windowed" box, and put a ribbon and some store bought flowers on the cover, just to pretty it up!

I used:
Gypsy Wanderings Cartridge for the Sentiment box
DCWV pre-made cards
Ribbons from my stash (recycled from packages)
Plastic rinestones
Martha Stewart corner punch
Stamps from my stash (One is from Stampin Up and the other I am not sure!)


Thanks for taking a look, and I hope you have a wonderful day!

A Twisted Thank You!

My Mom has been in the hospital for a few days, as you can read from the earlier post.  She is now home but still is not out of the woods just yet.  She still has a clot in her leg and now one in her lungs.  Scary, I know!  But I have faith in God that He will protect her and heal her. 
Anyways, I made this twisted easel card for a lady who attends my parents church and is their neighbor.  My parents have kinda "adopted" her as a daughter, and she considers my parents like they are her "adopted" parents.  Well, every time I needed something for their church to do, like call the prayer chain, make meals for them...she has taken care of that for me.  She is such a blessing to my parents and to me.  The thing is that about a year ago she lost her sister to a blood clot in her leg.  So she was such a blessing to us all in many different ways.  Thank You, Pam!  So I decided that she needed a card to let her know how much she was a blessing to us as a family.  So here is her card!  I just love the red, black and white combination!  Such a striking contrast.  The twisted easel card is so very easy to make!  Not a whole lot of a difference in making the front, the inside is different and small, but that is fine. Saying thank you, is never enough, so a simple small card is perfect. 

I used: 
Red & Black Cardstock
DCWV, The Luxury Stack (I LOVE this paper)
Black ribbon from my stash
My velum flowers using the Martha Stewart Hydrangea punch
Gypsy Wanderings Cartridge for the Sentiment box


Thanks for stopping, and I hope you have great day, today!

Thursday, June 2, 2011

It's Not A Picnic

Well, this card is for my Mom who is in the Hospital with a blood clot in her leg.  She is in a lot of pain from it.  She is also struggling with disappointment.  You see, she was supposed to be at my sister's home 6 hours away, getting a cake made for my niece who is graduating this weekend.  Let's just say that the open house has been postponed due to multiple sicknesses in the family.  So my Mom is really discouraged.  And since my Mom is my number one fan/enabler of my cards and paper crafts, I naturally had to make her a card, to hopefully cheer her up a little.  Hopefully, she doesn't freak out about the ants.  LOL  We hope and pray that she will be able to come home today or tomorrow.  Well, we will just keep praying for her to have a quick recovery from all of this so that she can travel in a few weeks. 

I used:
Cuttlebug folder
Papers from my stash
Kate's ABCs Cartridge: frame for the sentiment
Stretch Your Imagination Cartridge:Watermelon
Red ink pad
White Ribbon
Ant stickers from EK Success from Micheal's years ago
The picnic basket is from my computer scrapbook program, I cut it out of a picture
The sentiment is computer generate,also.


Well, thanks for stopping by and I hope your day is wonderful!